Product Experience
Begin setting up your iOS app's Product Experience!
Note
- Product Experience SDK is available for integration from Netcore CE SDK v3.1.0 onwards.
- CE Product Experience SDK only supports Xcode 11 and above.
- Clients using Swift UI in iOS cannot deploy PNC nudges like tooltips, spotlights, or beacons due to architectural constraints that prevent identifying target elements for placement.
Step 1: Complete basic setup
Go to Basic Setup to start integrating your iOS project with Netcore CE.
Step 2: Add Hansel to podfile
- Cocoapods initialization
Open terminal, go to the project directory and run the following command:
pod init
This will create a podfile in your project directory.
- Add Smartech-Nudges to target
In the podfile, add the following line to app's target:
pod 'Smartech-iOS-SDK' , '~> <<base_sdk_ios_version>>'
pod 'SmartechNudges', '~> <<nudge_sdk_ios_version>>'
For e.g. if you want to install Smartech-Nudges pod to "Gretel" target, your podfile will look like:
target 'Gretel' do
	pod 'Smartech-iOS-SDK' , '~> <<base_sdk_ios_version>>'
	pod 'SmartechNudges', '~> <<nudge_sdk_ios_version>>'
end
- Pod install
Open terminal, go to the project directory and run the following command:
pod install
This will install the SDK in your project. Once that is done, close the Xcode project and open <app_name>.xcworkspace in the project directory.
Using .xcworkspace
Henceforth, .xcworkspace should be used to open this project in Xcode.
Step 3: Create Bridging Header for Swift
This step is not required if you are using Smartech Nudge iOS SDK 9.0.8 and above.
If you are using Swift, add the following import to your app bridging header file. If your project doesn't have a bridging header, follow this FAQs to create a bridging header:
[app_name]-bridging-header.h
#import <SmartechNudges/Hansel-umbrella.h>
Step 4: Updating Capabilities
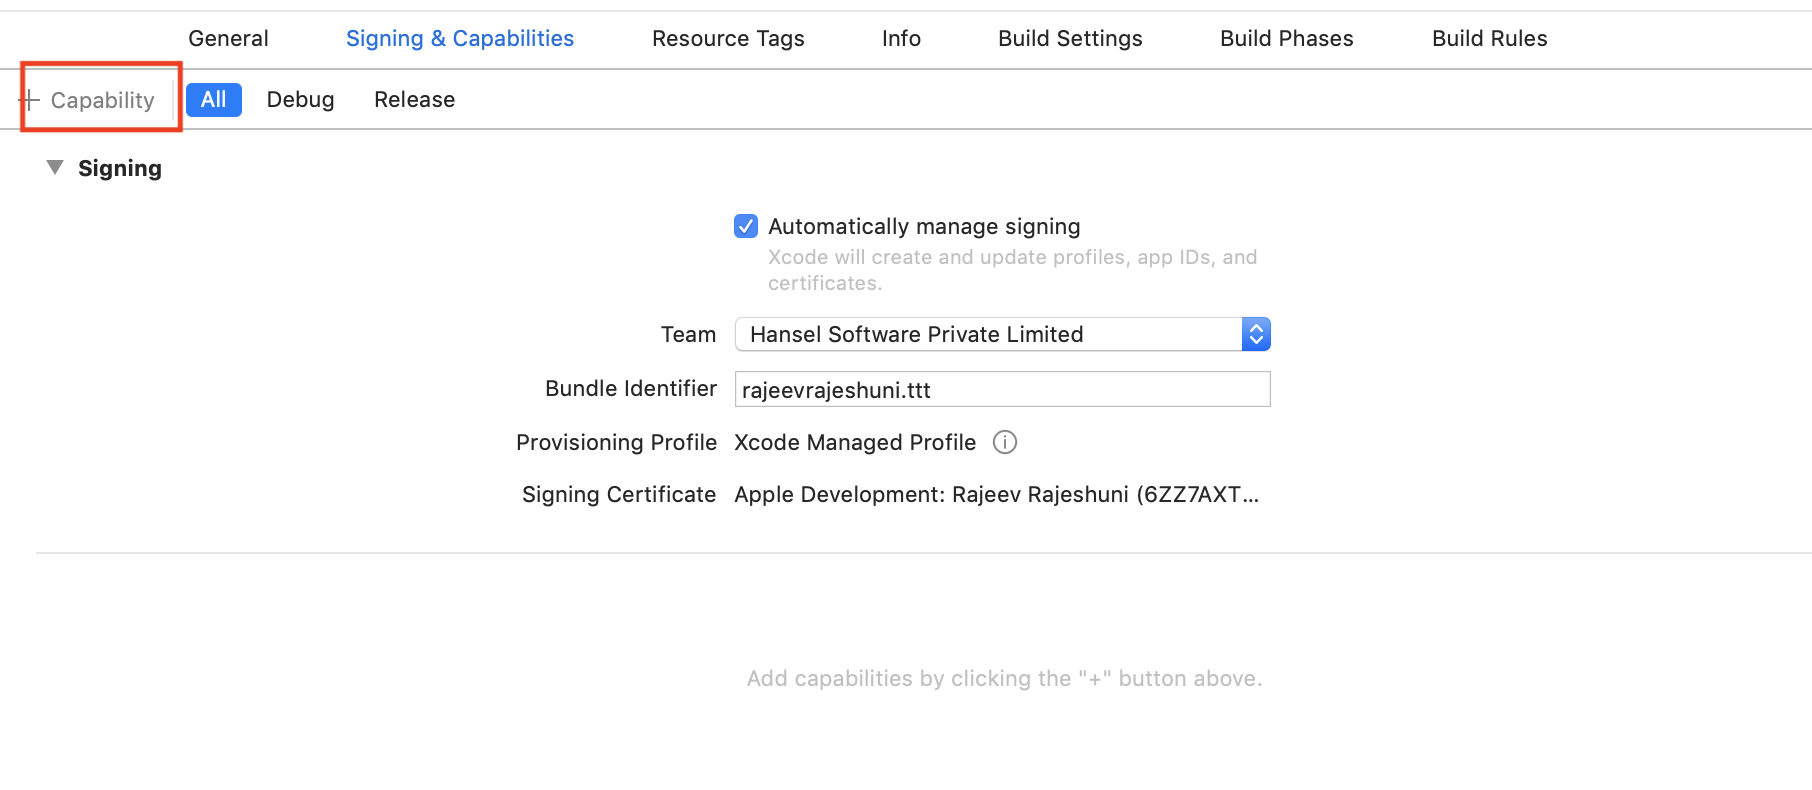
In Xcode target, go to Signing & Capabilities, and click on "+Capability" as shown below, if you do not have any "Keychain Groups" setup. If you do, you can directly proceed to the next step.

Click on "+Capability" to get started
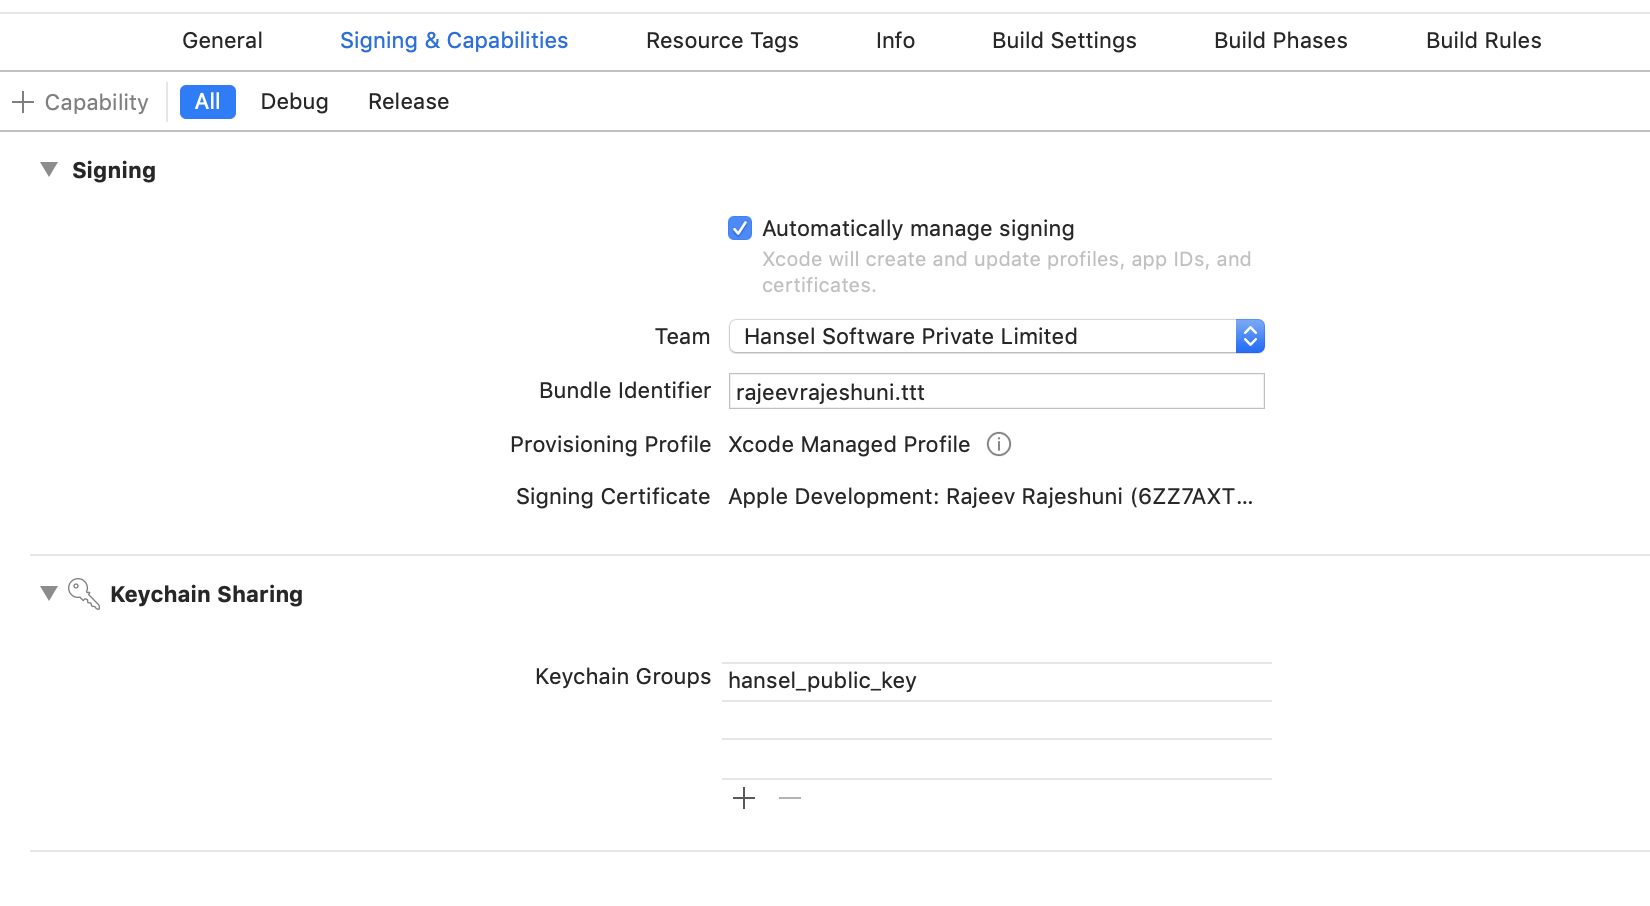
Add a new Keychain Group (as shown below) and enter hansel_public_key (Hansel uses KeyChain Sharing for decryption of Hansel SDK's responses)

Create a new Keychain Group with the value as shown
Step 5: Configure Apps Info.plist with Hansel Keys
You need to add a key named HanselKeys with type Dictionary. Init add the following keys and values with their types.
| Key | Data type | Description |
|---|---|---|
| HanselAppId | String | Please get in touch with your account manager to create app on Hansel dashboard |
| HanselAppKey | String | Please get in touch with your account manager to create app on Hansel dashboard |
Following is the source code snippet of apps Info.plist for key Hansel Keys:
<key>HanselKeys</key>
	<dict>
		<key>HanselAppId</key>
		<string>value of app id</string>
    <key>HanselAppKey</key>
		<string>value of app key</string>
	</dict>
Following is the image representation of apps Info.plist for key HanselKeys:

Step 6: Using existing analytics events for triggers and goals
You need to link Product Experience SDK with your analytics provider to measure the impact of the changes you make on the dashboard. Track multiple variations of the user experience ( for e.g. variations of the target button with different colors, CTAs, fonts, size, placement etc.) on your analytics dashboard. Product experience SDK sends all the related data to your analytics provider, without you having to add any extra line of code.
- Netcore Cloud
- CleverTap
- Mixpanel
- Amplitude
- Segment
- Firebase
- Omniture
- Google Analytics
- Localytics
- Other Analytics Providers: If you use an analytics provider other than the ones mentioned above, please reach out to your Account Manager.
Please note that the goal events sent to these analytics providers will have the below system parameters in addition to parameters that you will configure. These can be used to filter goal events data specific to an interaction map name and branch where the user falls into.
{
  hsl_counter: "2" //this is counter of how many hsl_data keys are present
  hsl_data: "J01:0123321,J02:2355235" //format:InteractionMapNameHash:BranchId
  hsl_data1: "J03:0123321"
}
Above analytics integrations, with exception of Netcore CE, are local to the device and none of the PII Information is shared back to Netcore servers.
Setting up page load events
You may use page load/page view events as triggers for Product Experience. You can check here on how to set them up .
Best practices:
- We highly recommend to implement page load events instead of using click actions for respective screens where you want to place the nudge.
- If your app has splash screen, we recommend to create custom homepage load event instead of using app load event for showing nudge on homepage.
Send nudge events to your own analytics system (HanselEventsListener)
If you wish to get nudge events shared back to your own analytics system, please follow the steps given here.
Step 7: Audience targeting based on user profile data
Server-side segments
If you want to use server-side segments as the target audience - please follow the steps given for user tracking & event tracking.
This will send data back to the Netcore CE servers and allow you to create segments based on user profile attributes & event payload data.
We recommend that you implement user tracking step if you plan to use feedback nudges
Client-side user profile data
If you want to keep user profile data at the client-side and use this information to target specific user ids, please follow the below steps.
Client side user profile data is local to the device and none of the PII Information is shared back to Netcore servers.
- User ID
This is a pre-defined attribute that can be the user's email id, account id, or any other identifier that you use to uniquely identify a user. If not set, Netcore CE SDK will generate a device-specific unique string to uniquely identify the app user.
#import <SmartechNudges/Hansel-umbrella.h>

//Setting User ID
[[Hansel getUser] setUserId:@"user_id"];

//Reset User ID and User attributes.
[[Hansel getUser] clear];
//Setting User ID
Hansel.getUser().setUserId("user_id")

//Reset User ID and User attributes.
Hansel.getUser().clear();
import {NativeModules} from 'react-native';

//Setting User ID
NativeModules.HanselUserRn.setUserId(userId);

//Reset User ID and all User attributes.
NativeModules.HanselUserRn.clear();
- Custom Attributes
Custom Attributes allow you to target users based on any data that you want. For example, to set a value for a custom attribute called “age”, you need to do the following:
#import <SmartechNudges/Hansel-umbrella.h>

[[Hansel getUser] putDoubleAttribute:25 forKey:@"age"];
Hansel.getUser().putDoubleAttribute(25, forKey: "age")
import {NativeModules} from 'react-native';

//For double attribute
NativeModules.HanselUserRn.putDoubleAttribute(key, value);

//For string attribute
NativeModules.HanselUserRn.putStringAttribute(key, value);

//For boolean attribute
NativeModules.HanselUserRn.putBooleanAttribute(key, value);
Step 8: Setting up Test Device
Once you have successfully integrated the SDK, ensure that you set up test devices. To learn more, click here .
Step 9: Firing events from test devices
Ensure that you fire the events which you added in step 5, from a test device. This can be done by invoking all the flows within the app, where the events have been added. To learn more on setting up test device, please click here .
Step 10: Advanced Nudges Features
Defining Actions
Product Experience SDK can also invoke a method in the registered listener whenever an action has been triggered for a given nudge. You can add additional logic in this method to perform any relevant tasks related to the action.
To implement this, follow the steps given here.
Handling invisible containers
If there is an invisible container in your app, you need to follow the steps given here for Product Experience SDK to ignore that container.
Support nudges on UICollectionReusableView
If you intend to place nudges on app screen having UICollectionReusableView , UITableViewHeaderFooterView, please follow the steps given here.
Custom HTML Nudges
Customize your nudges with HTML for better control and unique branding. Use custom HTML nudge to create nudges that perfectly match your brand and engage your app users. Refer to this document to learn how to create custom HTML nudges on the Netcore PX dashboard.
Setting app default font for nudge text
Customize the default font for nudge text by either setting a custom font or resetting it. Implement the provided code snippet in your AppDelegate.swift file to apply these changes.
//Apply custom font (SVN-Gilroy is an example font file name, you can use any font)
[Hansel setAppFont:@"SVN-Gilroy"];

//Revert to system default font
[Hansel setAppFont:@""];
//Apply custom font (SVN-Gilroy is an example font file name, you can use any font)
Hansel.setAppFont("SVN-Gilroy")

//Revert to system default font
Hansel.setAppFont("")
Step 11: Using A/B testing & feature management
To implement integration steps related to A/B testing and Feature Management - follow the steps given here.
Our SDK helps you to decouple product experiences from code on your app in real-time with product variables. These product variables lets you change the behavior as well as the appearance of the app without requiring users to download an app update.
Debugging
To check the logs of PX SDK, you need to implement a method named enableDebugLogs in AppDelegate class in method didFinishLaunchingWithOptions.
- (BOOL)application:(UIApplication *)application didFinishLaunchingWithOptions:(NSDictionary *)launchOptions {
  //...
 [Hansel enableDebugLogs]
  //...
  return YES;
}
func application(_ application: UIApplication, didFinishLaunchingWithOptions launchOptions: [UIApplication.LaunchOptionsKey: Any]?) -> Bool {
  //...
  Hansel.enableDebugLogs()
  //...
  return true
}
Note:
It is recommended to ignore/comment the above line before uploading the app to the App Store.
Updated about 1 month ago
